 Save
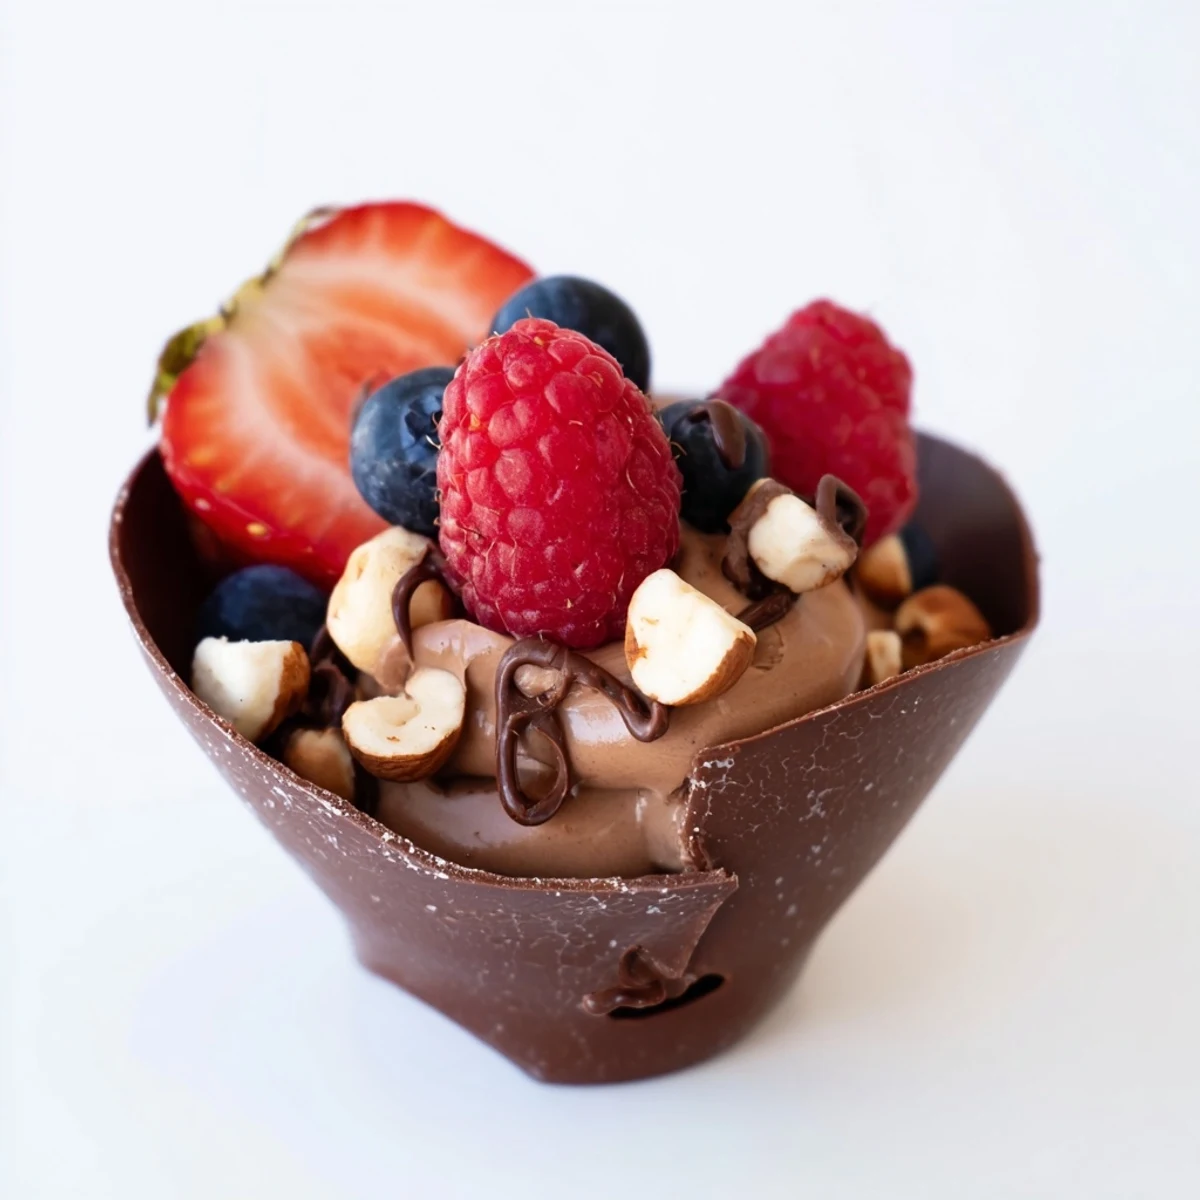
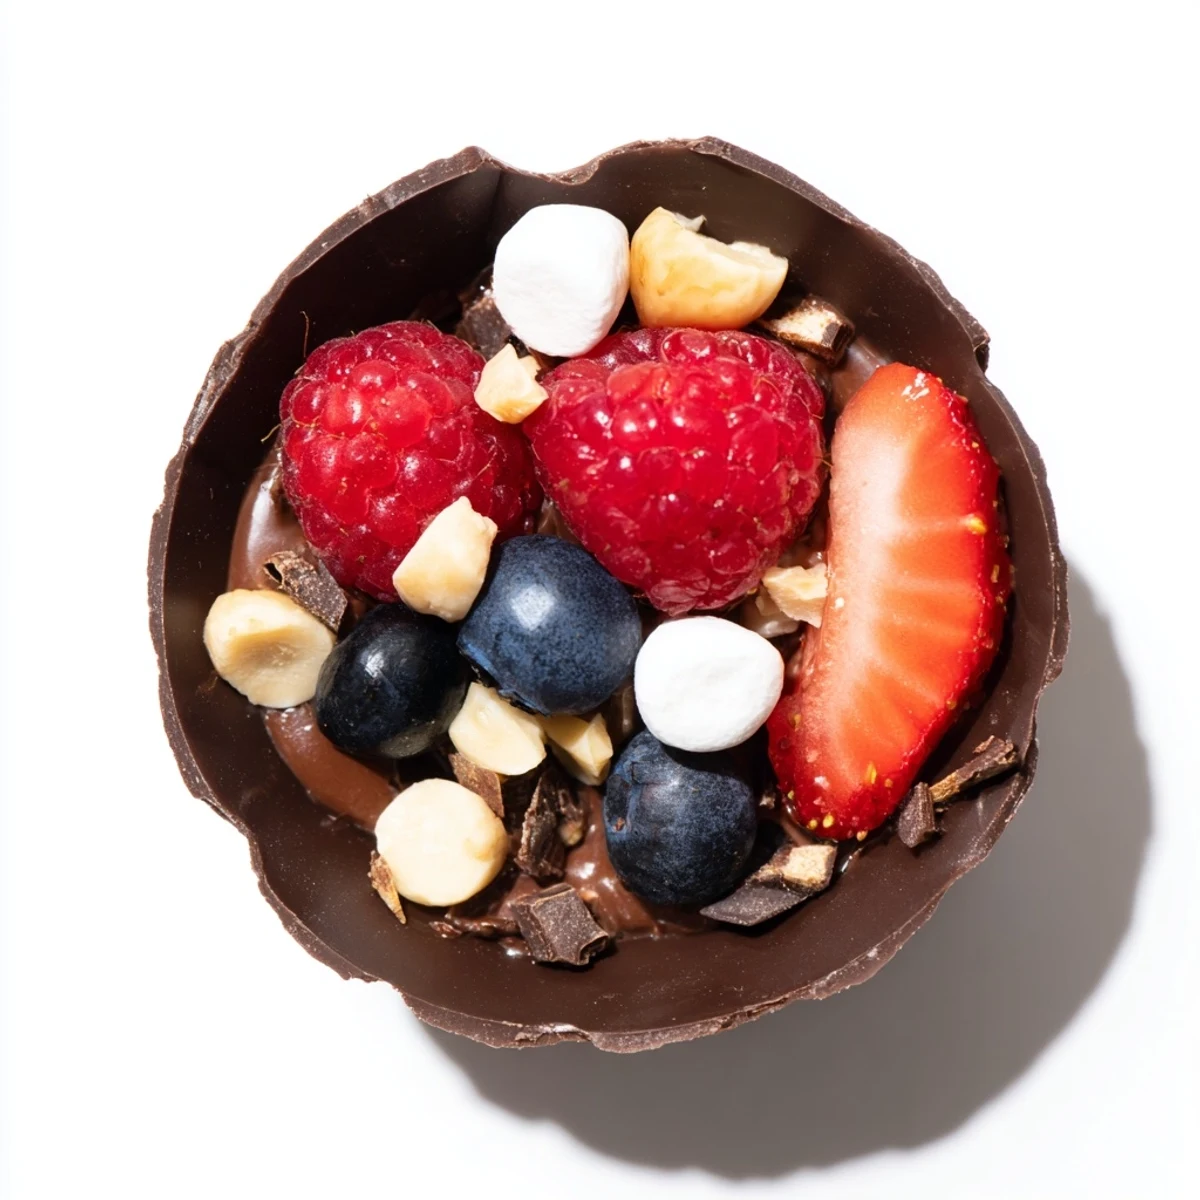
Save Create stunning individual chocolate cups filled with silky smooth chocolate mousse and topped with fresh berries, nuts, marshmallows, and edible gold. These elegant grazing cups combine the richness of dark chocolate with the freshness of seasonal fruits for an impressive dessert that looks as beautiful as it tastes. Perfect for dinner parties, celebrations, or when you want to elevate your sweet table with something truly special.
The first time I made chocolate cups, my kitchen smelled like a chocolatier's workshop for days. I'd spent the afternoon carefully painting melted chocolate into silicone molds, my fingers sticky with cocoa, trying to create something that felt fancy enough for a dinner party but didn't require a pastry degree. When they actually popped out perfectly formed, I did a little victory dance right there by the refrigerator. These grazing cups have become my go-to when I want to serve something that looks impressive but secretly comes together in under an hour.
I remember bringing a platter of these to my friend's birthday last summer. Her seven-year-old daughter took one look at the towering berries and gold leaf and declared them princess cups. The adults were just as enchanted, hovering around the dessert table and strategically choosing which cups to claim based on their topping preferences. Something about having your own individual portion makes people feel special, like they're getting a bespoke dessert experience.
Ingredients
- 200 g dark chocolate (at least 60% cocoa), chopped: I've learned that using anything less than 60% makes the cups too soft and prone to melting in warm hands
- 200 ml heavy cream: Chill your bowl and whisk beforehand, it makes whipping so much faster and gives you that cloud-like texture
- 100 g dark chocolate, chopped: This melts into the mousse, creating that intense chocolate flavor that balances the light whipped cream
- 2 tbsp powdered sugar: Don't skip this, even if you prefer less sugar, it stabilizes the whipped cream beautifully
- 1 tsp vanilla extract: Pure vanilla makes all the difference here, artificial never quite captures that warm aromatic depth
- 1 cup fresh mixed berries: I buy whatever looks brightest at the market, but raspberries and strawberries are non-negotiable for me
- 2 tbsp chopped nuts: Toast them lightly in a dry pan first, it brings out their natural oils and makes them taste positively luxurious
- 2 tbsp mini marshmallows: These add such a fun fluffy texture contrast against the smooth mousse
- 2 tbsp chocolate curls or shavings: Use a vegetable peeler on a room-temperature chocolate bar for perfect curls every time
- 1 tbsp edible gold leaf or pearls: Totally optional, but I keep a small jar in my pantry for moments when I want to feel extra fancy
Instructions
- Craft your chocolate cups:
- Melt the chocolate in 30-second bursts, stirring between each interval until it's glossy and smooth. Working quickly but carefully, paint the melted chocolate up the sides of your liners, making sure you have a thick enough layer at the base so they won't crack when you peel them off later.
- Let the cups set:
- Pop the tray into the refrigerator for at least 20 minutes. I've tried rushing this before and ended up with a chocolatey mess all over my hands, so trust me on the chilling time.
- Whip up the mousse:
- Melt the second batch of chocolate and let it cool until it's just warm to the touch, then whip your cream with the sugar and vanilla until soft peaks form. Fold a spoonful of cream into the chocolate first to lighten it, then gently fold that mixture back into the remaining cream, being careful not to knock out all the air you just whipped in.
- Assemble your grazing cups:
- Spoon or pipe the mousse into each chocolate cup, filling them about two-thirds full. Top with berries, nuts, marshmallows, and chocolate curls, arranging them like tiny edible landscapes that invite people to dive in.
- Chill before serving:
- Give the assembled cups at least 20 minutes in the refrigerator to firm up slightly. They're best served cold but not rock hard, so pull them out about 5 minutes before you're ready to impress your guests.
 Save
Save My sister requested these for her wedding shower, and I spent a peaceful Sunday morning with music playing, assembling thirty of them while the rest of the house slept. There's something meditative about piping mousse and arranging berries, creating these tiny perfect worlds in chocolate. When guests started arriving and their eyes lit up at the sight of the dessert table, I felt that familiar thrill of making something beautiful with my own hands.
Making Them Your Own
I've experimented with white chocolate cups filled with raspberry mousse for a stunning pink and white contrast that's perfect for spring gatherings. Sometimes I'll add a splash of orange liqueur to the dark chocolate mousse, which gives it this sophisticated adult flavor that pairs beautifully with after-dinner coffee. Don't be afraid to play around, the basic technique stays the same regardless of your flavor combinations.
Timing Is Everything
Through trial and error, I've learned these really are best made the same day you're serving them. The chocolate cups stay crisp, but the mousse starts to weep slightly after 24 hours, which isn't the end of the world but definitely loses that fresh-from-the-kitchen magic. I make the cups one day ahead, then whip the mousse and assemble everything a few hours before guests arrive.
Serving Suggestions
I love arranging these on a pretty platter or cake stand at different heights to create visual interest. They're conversation starters all on their own, but I've found they pair wonderfully with a dessert wine or espresso service. Keep some extra toppings on the side in small bowls, guests always get excited about customizing their own.
- Set up a little topping station and let guests add their own finishing touches
- If you're serving these outside, keep them in the shade or bring them out just before dessert time
- Have a small offset spatula ready in case any chocolate cups crack during transport
 Save
Save There's something deeply satisfying about eating an edible container, like you're getting away with something delightfully naughty. These grazing cups turn dessert into an experience, and I hope they bring as much joy to your table as they have to mine.
Recipe Questions & Answers
- → How far in advance can I make these chocolate cups?
-
For optimal texture and freshness, prepare these cups on the day you plan to serve them. The chocolate cups and mousse can be made separately up to 24 hours ahead, but assemble just before serving to maintain the crispness of the chocolate shell and freshness of toppings.
- → Can I use different types of chocolate for the cups?
-
Absolutely! While dark chocolate provides a sophisticated richness, you can substitute with milk or white chocolate for different flavor profiles. Keep in mind that white chocolate may be slightly softer and require extra chilling time to set properly.
- → What other toppings work well with these grazing cups?
-
These versatile cups pair beautifully with various toppings. Consider crushed cookies, shredded coconut, fresh mint leaves, caramel drizzle, sea salt flakes, or even seasonal fruits like sliced figs or pomegranate seeds for different presentations throughout the year.
- → How do I store leftover chocolate cups?
-
Store any assembled cups in an airtight container in the refrigerator for up to 2 days. The texture may soften slightly, and fresh berries might release some moisture. For best results, store components separately and assemble fresh before serving.
- → Can I make these cups without cupcake liners?
-
You can create free-form chocolate cups by painting the melted chocolate onto the inside of greased silicone molds or small bowls. Alternatively, use small acetate sheets or wax paper cups. The key is creating a smooth, even layer that's thick enough to hold its shape once chilled.
